Many times we can look at a photograph and know intuitively that the colors are off. You may not necessarily know exactly what’s wrong if you are new to this, but if you were able to compare that photo with an identical photo of correct color balance, then you may be able to explain why. Another more commonly used term for this concept is White Balance. Photos with correct white balance, appeal to the eye much more than those that are not, because they express the true colors that our brain would receive from our eyes of the original scene. A photograph with its whites truly white and its blacks truly black is one that is correctly white balanced. All other colors in the light spectrum will be automatically set in their true state.
Color Temperature
Your D-SLR has built-in light temperature detection from its sensor to measure how warm or cool the light is that comes from the main light source. There is a bit of confusion with the terms ‘warm’ and ‘cool’ in photography. Artistically, when we see photographs that have a yellow cast, we may consider them to be warmer than photos that are bluer. However, scientifically speaking, blue light is of a higher temperature than yellow light. It’s the same case with light from a flame, because the hotter a flame is, the bluer it will be and the cooler a flame is, the more yellow/orange it will be. Color temperature is like the fingerprint for a specific color and is measured in Kelvins (K). Take a look at the color temperature chart (courtesy of www.mediacollege.com) that makes note of common lighting conditions that you may encounter when taking photographs. The temperature of light at sunrise is roughly 2000 K compared to the temperature at noon which is roughly 5500 K. You will need to compensate for each lighting condition that you encounter by either using your D-SLR’s white balance presets, one of which allows manual set-up.
White Balance Presets
The 4 photographs below were taken to illustrate how white balance presets can affect the outcome of a photo. All four photos were taken with the same settings (aperture, shutter speed, focus point etc.) except for each photo having a different white balance preset.


These photos were taken in a semi-shady area with sunlight as the source of light. On a Canon D-SLR you will notice that you have 8 white balance options:
- Auto (2000 K – 10,000 K),
- Daylight (5200 K),
- Shade (7000 K),
- Cloudy (6000 K),
- Tungsten/Incandescent Light (3200 K),
- White Fluorescent Light (4000 K),
- Flash (6000 K) and
- Custom.
The first 7 options (that is all options excluding custom) are predetermined by the D-SLR and cannot be altered by the user. The rule of thumb is to select a white balance option that best matches the lighting situation that you are shooting in. In my case, It would have been best to start off by using the Sunlight or Auto since I wasn’t totally in the shade. The Tungsten preset is best used where light from incandescent bulbs is the main source of light for your subject. In my case, it was a bad choice because my subject wasn’t under tungsten light conditions but rather under moderate sunlight. The result is that the color temperature is too ‘cold’ in the photo, therefore having a blue cast. The Auto preset (Photo 4) did a fair job under the lighting conditions but for my liking, the outcome was also a bit too cold. If you are photographing in situations in which you have to be quickly moving in and out of various lighting conditions, then the best option in that case is to use the Auto white balance preset. The Shade preset caused Photo 4 to have an yellowish cast and this is because the camera expected a high color temperature reflecting from the subject and compensated for it by adding warmer tones. The Daylight and Auto preset suited this situation best with the Daylight option as my preferred choice as it is slightly warmer.
The limitations of white balance presets
The disadvantage with using white balance presets is that you will virtually always get an approximation of what the neutral zones are (i.e. black and white zones). Say for instance you choose the Daylight preset and take pictures at sunrise (2000 K) and at noon (5500 K). The photos taken at sunrise may turn out to have a yellowish cast whereas the photos taken at noon may be more balanced.
This is because the Daylight preset on the D-SLR is set to add warmer tones to a color temperature of 5200 K for correct color balance. Light at sunrise is already yellowish and the Daylight preset will add even more warmer tones to the photograph. Also, your D-SLR’s sensor may ‘see’ whites as overexposed and compensate for this — making them look light grey. Similarly for blacks, your D-SLR’s sensor may detect them as underexposed and compensate for this by making them dark grey. This can be frustrating, and there are basically two ways to deal with such an issue. One is to perform white balance correction with software or to make use of the better option which is to manually set your D-SLR’s white balance.
Manually setting your D-SLR’s white balance
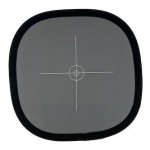
To manually adjust your white balance you need an extra piece of an accessory called the 18% grey card. It is tested and well accepted that 18% grey is the neutral that D-SLR sensors can use a perfect color reference. Usually, the 18% grey card comes along with the white and black versions.
18% Grey Cards + More
The Lastolite 20-Inch Ezybalance Card has white on the reverse side, and black trimming. I recommend this because it’s washable and can be folded and put into its pouch. This makes it quite easy to carry around.
The Opteka Pocket-Sized Reference Color & White Balance Grey Card Set is another choice, that has a neck strap with a quick release for convenience and easy carriage.
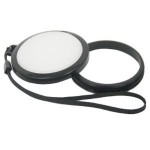
There is yet another option which is a white balance lens cap that is to be screwed on to the front of your lens. It is used in basically the same way as a grey card. An example of this is the Combo 58mm Lens Cap + White Balance Diffuser Disk.
The accuracy between cards and caps are strikingly close, so it comes down to personal preference when buying. Other than that, there are several other options for 18% grey cards that you can explore including microfiber cloths.
6 Steps how to manually set white balance
Once you have your Card(s) or Cap, then you are only a few steps away from getting your photos excellently balanced. Here are the steps:
- Make sure your camera is set on CUSTOM white balance.
- Place your grey card next to your subject or allow the person you are photographing to hold the card. (In the case of the cap, point your lens in the direction of your subject.)
- Fill the viewfinder of camera with the grey card and take the photo. (If you use the cap, you need to keep your lens on manual focus because your D-SLR will not be able to focus on the cap.)
- Press the MENU button, and select CUSTOM WB. The picture that comes up should be the one that you just took, but if not, navigate to the photo that you took of the grey card.
- Press SET then OK. Press SET again.
- Start shooting as you keep the white balance on CUSTOM.
Take note that you will have to re-do these steps either when lighting conditions change or if you enter into a different lighting condition for taking photos.
Sometimes it may not be practical to custom adjust your white balance such as when you are in a fast-paced environment, and the alternative option is to take the reference photo with the 18% grey card or lens cap then continue shooting and later adjust the white balance with software such as Canon’s Digital Photo Professional (DPP). If you opt to do this, it is better to shoot RAW files which are uncompressed and respond to adjustments far better than JPEGs. Otherwise, you can make use of the other white balance presets. Nonetheless, you can save yourself valuable time in post-processing by manually setting your D-SLR’s white balance.
You don’t have to guess anymore or take trial and error photos when it comes on to white balance. You can get accurately balanced photos like the Pros once you decide to set your white balance manually. You will get approximations when using the first 7 white balance presets, but they can work out fairly well if you select them intelligently. So, if you haven’t already gotten your 18% grey card, I recommend that you get one and follow the steps. Take more control of white balance settings on your D-SLR and I guarantee that you will get better photos.
 Canon5Dtips Photography is more than words.


