This 8-step “DIY How To” will help you understand how to prepare and photograph your own water droplets or other liquid droplets from the comfort of your home.
How I got into droplets photography? To make a long story made short: right after I bought my first — and only for now — D-SLR, the Canon EOS 40D, I had a ‘great’ idea to shoot droplets. It was an idea that I thought was special and unique — silly me :). I was excited and my imagination ran wild.
I invited a friend to check out the setup I prepared. Then, I made some shots.
Without any prior knowledge I made my first photographs of droplets. Out of 200-300 images there were at least 30 good, and 2-3 top shots.
Now, after a couple of years being equipped with more knowledge and equipment, I thought it was time to return to the same task and write little “How To…” and present how things went.
At first I was so self confident that I would outperform my first droplet tryout that I was surprised when I ran into small issues that I thought I understood.
There were a couple of successful things that came out of my first droplet images tryout:
– I made poster from my first tryout ;)

– one of the photos ended in little book available at Amazon: Focus Letters.

These images that I made were shot on the floor of my living room with my camera on a chair with a flash unit (the Speedlite 430EX II) mounted.
We prepared the setup for our second tryout this time with a little more equipment including an extra flash unit, a tripod and a remote trigger. However, you don’t necessarily need all of this equipment to accomplish the task.
The basic equipment that you need to make amazing shoots of droplets are :
– at least one flashgun.
– flash cord to extend flash movements.
– light stand for flash unit– not necessary but useful to have.
– flat surface (table or floor).
– bowl, with smooth smooth and level rim.
– camera that can shoot in manual mode.
– preferably macro lens — not a ‘must have’ but the best results are received through using them.
Additional material and accessories that are good to have:
– color gels.
– extra flash unit.
– bouncers (plastic that goes on top of flash) – for water it is better to have that harsh look without bouncers
– reflective surface and/or piece of white sheet or similar – for fill light if you have one flash.
– milk or similar white liquid.
– fruit with great colors (lemon, orange or smaller colored fruit like strawberry).
– good will and little patience ;)
While we could go to studio and make shots in perfect conditions, my goal was to prove that everyone can do it from the comfort of their home. So let’s go through eight (8) steps of how to make great images of droplets in your home.
How to make good looking droplets from your room
Before shooting make sure that you have fully charged batteries for your camera and strobes; a memory card with enough storage space.
Step 1 – Find Place for your setup and bowl
First, find a conducive place where will you do your shoot. As stated earlier, my first shooting was on the floor. All you need is a flat surface where you will put the bowl with liquid. This time we used black wobbly table ;) The bowl can be black or transparent; any shape any size.

The table was placed incorrectly from this picture because one pair of legs was placed on a small carpet, and the other pair was placed on a big a carpet. We corrected this issue before taking any photographs.
Step 2 – Setting up background


")
We used a Ratchet Bar Clamp/Spreader to hold our background (an old calender) in the position we selected. Not an ideal solution, but it is much cheaper than stands with arms.
The advantage setting up the background like this is the liberty of turning the pages on the calendar without disrupting the setup or even tearing the calendar apart. You can of course use any other background material or color you want. Single colored backgrounds work well too.
The bowl used is not of pure transparent glass, but is rather made of a blueish decorative glass with some lines and bulges. However, the bowl has a smooth and level rim — which is very important. Decorative glass reflects some amount of light to the surface which can be distracting, but on the other hand it may give you cool and unique effects.
Step 3 – Setting up lightning (Flashes)


Halogen work light stand used as Flash holder.
I cut off the head of a screw so that the threading would be exposed on either end. One part goes into stand, and the other goes into the hot-shoe of the strobe holder.
I used a Canon Speedlite 580EX II as the master which triggered 430EX II on stand. Later I changed setup and put the 580 EX II on a light stand left from bowl and the 430 EX II was placed on the right side of the little box pointing just above bowl. Master 580 EX II was connected to the camera with a Yongnuo (Off-Camera Sync Cord FC-681).
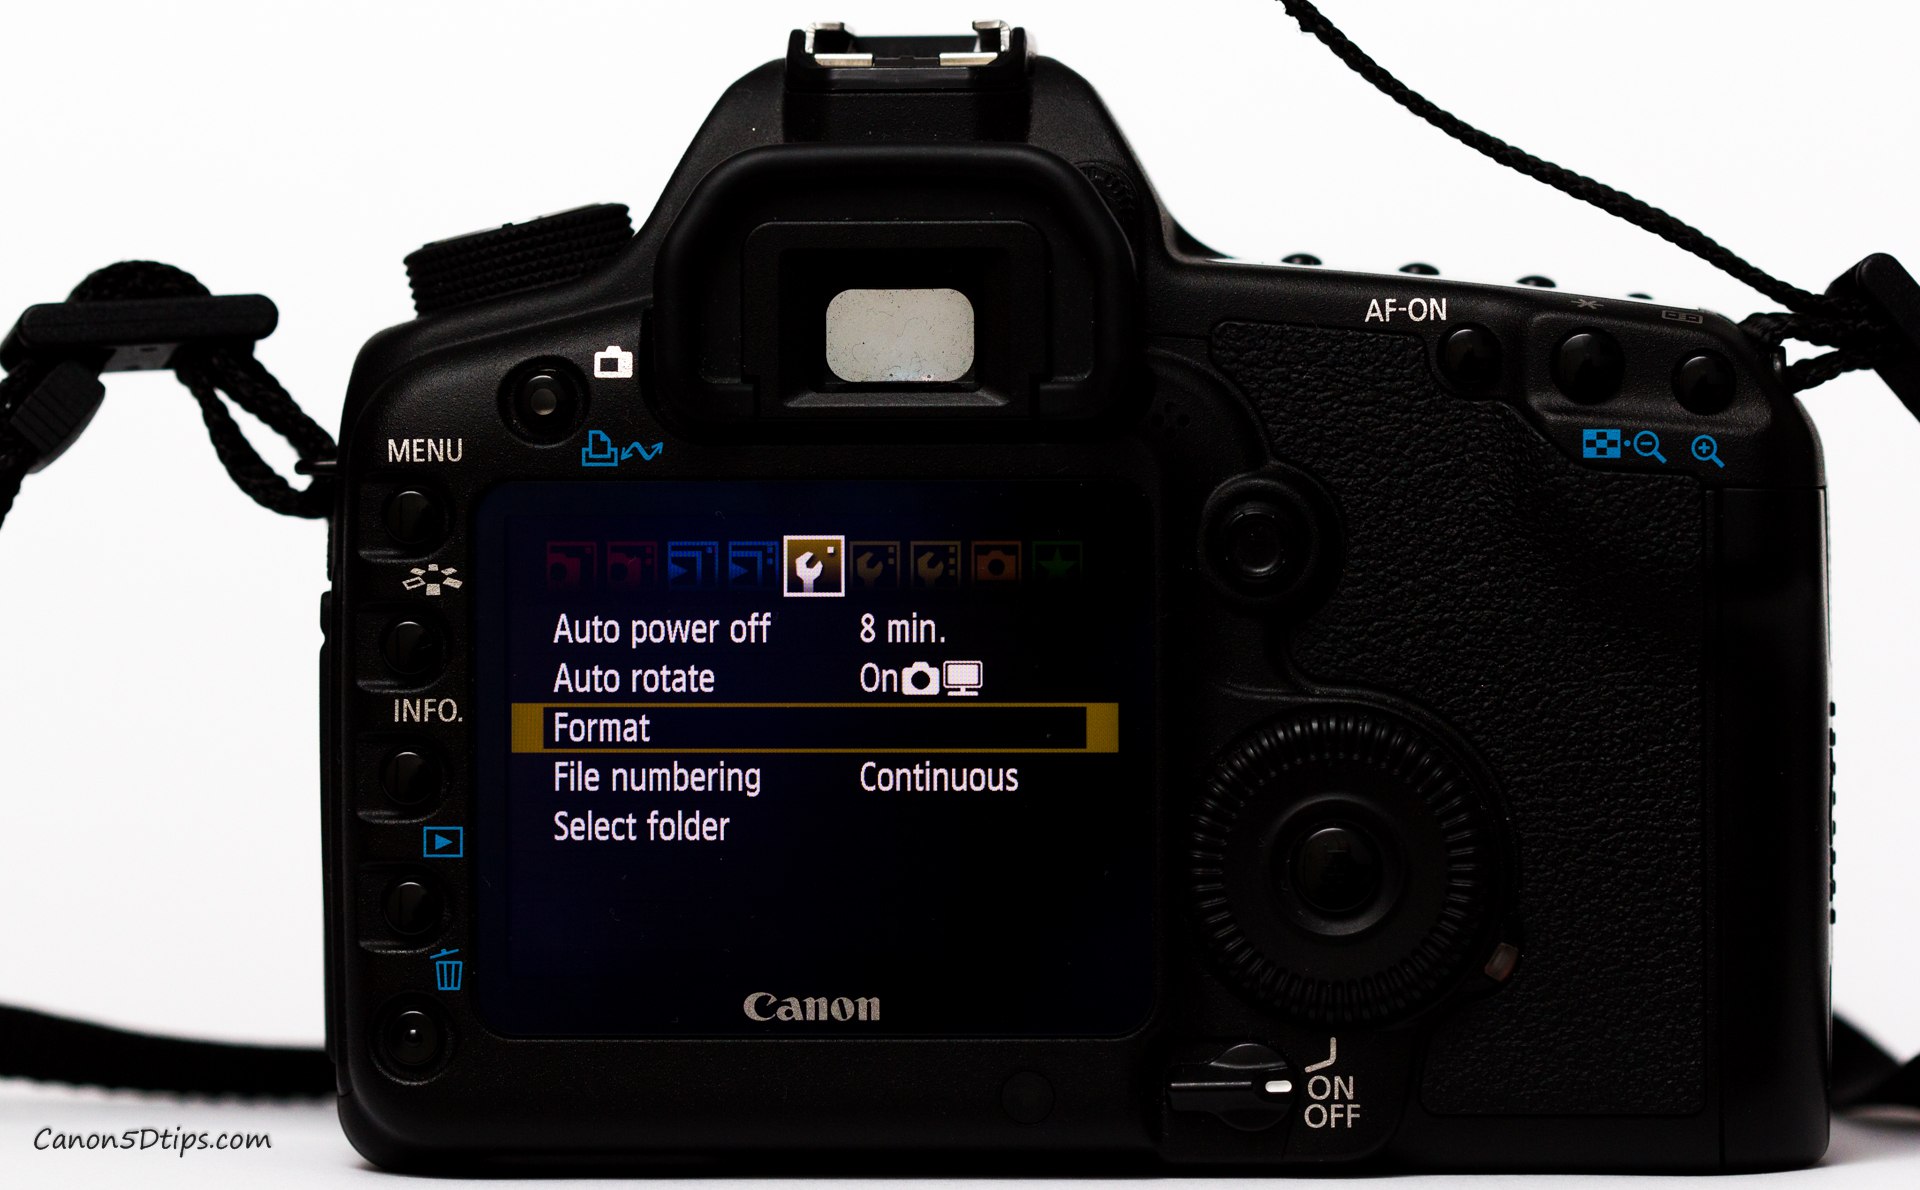
Be aware that Speedlite 430EX II can’t go in manual to 1/128, but if you set it up in Camera menu (if you have such option), it can shoot at 1/128.
Step 4 – Prepare camera
In our case we used Canon EF 100mm f2.8 Macro Lens.
Mount lens on camera and mount camera on stand. If you don’t have a tripod use a flat surface, but make sure that you don’t move the camera or the surface once you set them in place.


- Canon EF 100mm 2.8 Macro on 40D


This image on which we noticed carpets ;).
Step 5 – Prepare and attach source of water drops


Fill plastic (freezer) bag with water — a bit less than half — and tie it on bar or holder. Adjust the height of bag based on your desired effects. The higher you go — droplets will bounce higher and splash wider, but the lower you place the bag the droplets will be slower, smaller and the splashing will be less.
Fill bowl with water to the very top. As you can notice, our table was not completely horizontal, but I said it was wobbly table, didn’t I? ;)
We put some Canon5Dtips visit cards under the legs of the table to get the table top horizontal. To let you in on a little secret — the surface doesn’t have to be completely level, however, it would be good if you can make so.
Step 6 – Let them drop and adjust Focus
Before you focus you need to have your drops ready. So the next step is to punch a hole in the plastic bag.

If you do this step incorrectly, you could end up with a wet table, or worse case scenario — wet camera equipment! It is normal that after you punch a hole the water may not drip as fast as you think it should. All you need to do is to wobble the needle a little bit in all directions. Leave the needle in the bag unless you want to sprinkle everything like I did.

You can stop sprinkle by duct tape if you are short on plastic bags. Just make sure that you cover the hole completely.

Choose the needle that best fits your idea. Bigger needle caps will mean larger droplets. The smaller the cap of needle, the smaller the drops will be.
In the end I used the middle needle. After you get it all right, and you are happy with the speed of droplets, don’t touch the bag!
After this step we need to focus on right spot.

")
This step is most the most important — so don’t miss it out.
A little trick to help you achieve accurate focus is to use a pen or a flat object (i.e. ruler, stick, water scale, anything flat and long enough ..) over the middle of the bowl, and adjust it so that drop hits the edge of your object closer to camera lens. Then focus within the region where the drop touches the ruler or whatever object you put there, or focus on drop that is left on your object and where new drop would fall next.
After you do this, switch to MF (Manual Focus) mode (to lock focus), and zoom in on your live view if your camera has that feature to check if your image is sharp enough. After you’ve successfully focused your lens, don’t touch a thing! If you’re not happy with the focus, you can always adjust the focus slightly in MF mode or just repeat the procedure using AF until you’re happy with image sharpness. After you are done, leave lens in MF mode. We don’t want AF to wonder around searching for the focus point we already found!
Any shaking or vibration to the camera (even from walking around it) could move our tripod and get the camera out of focus. This is why that after you’re through focusing, try your utmost best not to shake camera. In fact, the best deal would be not to even touch it anymore.

This is where timer remote gets pretty handy. I put chair behind camera, and I made sure that the remote cord doesn’t make any tension to the camera. You can get original or replacement trigger here.
Step 7 – Take a shot and play with settings

This image was taken before the real shootout. We put strobes at different positions after testing. Both Strobes were put near bowl on sides, slightly towards background (to avoid direct light into camera), on both Flashes we attached black business card on side to avoid light spilling on the background.


I was not completely happy with it, so I experimented some more.
The background was too distracting, and it is obvious that it is a poster. Furthermore, the winter section of the image was too reflective so we had to adjust the angle on autumn. The Droplet is clear and crisp, but nothing special or unique. Bowl rims aren’t too catchy either.
While we were changing setup for droplets, I wanted to test flowers stalk and droplets with flower in it. Ivan put my sweater as the new (black) background and I made some drops with medical needle on the broken flower stalk.

This was tryout for flower in drops.

The third Flashgun was not used.
As you can see on the photo, one strobe was positioned on the bottom-left, master was on camera (didn’t fire) and the third was placed on the right. The task is do-able with only 2 flashes or even a single flash along with a reflective surface as well.
I could use, for instance, a cord to move flash off from camera.
The end result was an image without the flower because the flower was too deformed in water drops. If the shape of the droplet is more circular (or spherical) the better the end quality of the photograph will be.

I’m still not completely happy with this shot because the entire equipment setup is reflected from the droplets. This setup and image was not our main task, so we left it as it is, so we continued with our droplets shots.
Settings for our best shots
The best and sharpest images that were shot with the EOS 40D were when:
- the aperture was f/6.3,
- Images shot with a smaller aperture than f/6.3 were blurred. At f/16 images were completely blurred and useless. Better D-SLRs than the 40D will produce better images even with the same lens. For instance, even the (first generation) EOS 5D Mark 1 had a noticeably better IQ,
- shutter speed was 1/6th (sec) to 2/5th (sec),
- ISO was set at 100,
- the flashguns were set to 1/64 of the power each.


Almond Splash
ISO 100 100mm f/13.0 2.5 sec
As our conclusion and article says, slower shutter speed, lower Flash power (1/64 on above image), made the crispest of photos. This one was shot with a Canon EOS 5D Mark I, Canon EF 100mm f2.8 Macro Lens, at f/13 and shutter speed 2.5 sec, ISO 100. While the Canon EOS 40D could not dream of such clarity from f/13, a similar image quality can be achieved on f/6.3, while less water would be at focus.
Step 8 – Post process
In most cases, especially on your first attempt, your debut shots will not be spectacular. Don’t expect out of the box stock photos. You will need some time and adjustments. Even with great photos that you take, you’ll still need to perform a little cleaning and adjusting. Some of the most common adjustments can be made using a variety of image software, but we recommend Adobe Photoshop or Adobe Photoshop Lightroom.
We used Lightroom:
- to push some clarity to get better glass effect and maybe some sharpness if needed.
- to create dark (if not fully black) backgrounds. You can move the black and shadow sliders to the left until you get a completely dark background if the background of your image is not dark enough for your taste.
- to crop out (or in a sense ‘delete’) the bowl rim if visible on the image. You can avoid having to do this if you can use a larger bowl.
- to increase or decrease the exposure. This is very subjective, and you can make these adjustments based on how you feel about the image. If image is too dark you can give it a little more exposure, and if it’s too bright you can try a lower exposure.
You can adjust image sharpness as well, I tried not to mess much with photos, in fact, as little as possible to get best result.
For sure you can find on internet much better photos, but with more imagination and ideas you can produce awesome shots as well.
This time I knew about the High Speed option, and I thought I would make crisp droplets with high speed… boy I was wrong ;)
Hint:
High speed photography with high speed syncing of Speedlites could turn out to be contrary to your expectations. Images where drops were flying were messed up and blurry. Images made from my first shoot a couple of years ago were with a speed of 250 combined with an aperture of f/5.6 or even f/6.3. Back then I didn’t know how to setup Hi speed sync on my flash.
We even tried with milk and threw objects into milk. That part you don’t want to see ;)
We were wondering why is it that all the images were blurry, but then we found out that there are few possible reasons: flashgun lag, time of the flash on higher power (1/16 and stronger). So what to do ? The logic is similar to taking photos at night: slow shutter speed, dark room, and freeze moment with a flash. Conclusion is that flash fires faster on lower power settings e.g. 1/32, 1/64 and 1/128..
But one thing to think about is that the weaker the Flash output is, the sharper the image will be, faster flash, better freeze! I mean a speed of flash powered at 1/128 or 1/64 is much faster than 1/4. To allow more light in the shutter speed you may need to adjust shutter speed down to 2″ (2 seconds), or around 1″ (1 second). The truth is that in capturing an image of an object in the complete dark with 1-2 sec shutter speed could be real adventure and patience test, but I believe it is worth a try. You can pre-fire couple of shots with a lower ambient light, it shouldn’t be visible on image and you would be able to see droplets.
If you after all this get to the point where you really want to take amazing shots with really cool effects and with amazing clarity, you might consider buying some of the triggers. Those we will write about as well.
Here are couple of examples with 1/200 and 1/250 sec, before we came to the conclusion that lower shutter speed actually gives sharper results. On mouse over images, you will see our camera settings, flashes are on minimum possible settings, that is on 40D at 1/128 and on 5D at 1/64 of the power.

Green Crown made of water
ISO 100 100mm f/8.0 1/250 sec

Red water droplet in shape of letter “i”
ISO 100 100mm f/8.0 1/250 sec
For these shots I used colored gels. Both images are with one flash and one color.
While what I like the most:

Wizard Hat
ISO 100 100mm f/9.0 1/200 sec

Water drop multi color
ISO 100 100mm f/9.0 1/4 sec
These images were shot with two flashes both with a different color gel attached. From one side blue, and red from the other side. Right (red) Flash was in hand, pointed to the drops from many positions, until our results were pleasing. On this particular image that flash was from the top.
Some other shots that we made with same setup, without color gels.

Flower on Black
ISO 100 100mm f/4.0 1/200 sec
Note:
To be brutally honest with you I didn’t get deep into liquid photography. I saw images that I know I couldn’t make and my idea of taking amazing shots fell apart.
One thing that comforts me is that I didn’t use any water releasing controllers. I have learned a lot while writing this article. I hope this article will help you figure out the basics — the ‘making of’. I don’t have water drop controller and I can’t make shots of two drops colliding. For such setups, you can check out this sites:
How it looks:
Water Drop Collision – flickr
What you need:
Time Machine Drop Kit
Water Drops Kit
and many more sites, searching on google for water drop controllers, etc.
Conclusion
You should be aware that there are whole mechanisms and techniques just for taking images of droplets. They can make your first droplet images breathtaking, but everybody can make it now in their own home with minimal equipment. I presented you simple homemade setup where you can have your playground and make your droplets or any tabletop photography as you like. You can play with different lighting, backgrounds (behind or under bowl) and liquids. I’m really curious — please if you try it out and tell us about how it went along with sample images in the comments.Enjoy making your own droplet photography. If you have any questions, feel free to ask in comment.
Equipment used:
For shooting:
Camera: Canon EOS 40D and Canon EOS 5D Mark I
Lens: Canon EF 100mm f/2.8 Macro
Strobes: Canon Speedlite 430 EX II & Speedlite 580 EX II
Hot Shoe extender: Off-Camera sync Cord Yongnuo FC-681
Remote Control: Timer remote Yongnuo
Tripod: Manfrotto 0X55ProB and worker yellow halogen light stand for flashgun
Tripod Head: Manfrotto 488RC4 Ball Head
Strobe Gels:
Background: Tommy Hilfiger sweater ;)
For Back Stage photos:
Camera: Canon 5D Mark I
Lens: Canon EF 16-35mm f2.8 L II USM Lens
Strobe: Canon Speedlite 580 EX II