Your camera has its own internal metering device that receives information Through The Lens (TTL). Its method of processing information is based on the metering mode that you choose. Four popular metering modes include: spot metering, center-weighted metering, partial metering and evaluative (matrix) metering. Each mode takes an average reading across a certain area of the scene, however evaluative metering does this in a more sophisticated way than the others.
The Sacred 18% Gray
You may find that in taking a photograph of a black surface, your camera may overexpose a bit as it seeks to produce that sacred 18% gray. In a similar sense, if you take a photograph of a white surface, your camera may underexpose for producing that same 18% gray. This is what it comes down to — the (core) midtone, or ‘middle gray’. 18% gray is the reference point for exposure and in effect color. So in every scene, the camera, using its own inbuilt algorithm, will seek to find that reference point or that which is closest to it. This is why there is a buzz about exposure cards including the 18% gray card, as well as innovations derived from them including lens caps. Based on this problem, you can ‘see’ why a white card may not be the best option for core exposure references.
A Common Camera Metering Problem
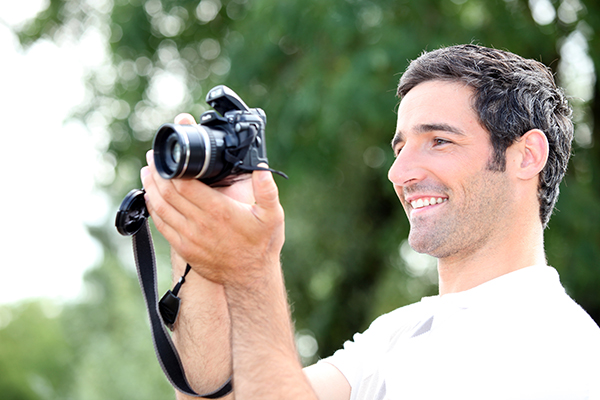
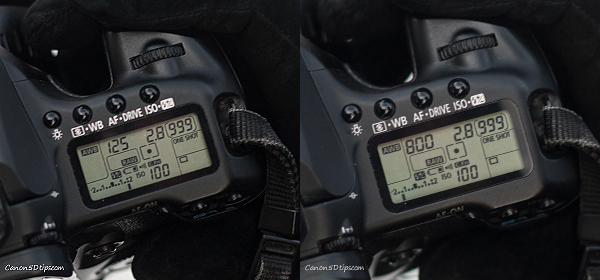
You will run into the same problem described before when taking photographs of persons when they are dressed in dark or light colored clothing, or even if they are standing before a dark or light background. On the images shown below there is a comparison that shows roughly how the metering on your camera works. The camera was set to work in aperture priority mode (Av) and the difference in measuring the light was achieved by pointing the middle point both at Tom’s face and dark tree on the right. The first test was done by using spot metering and the difference was huge as the spot metering sets the exposure on the exact little spot you point your camera at. The evaluative metering on the other hand chooses a much wider portion of the scene to calculate the right exposure which results in a more evenly exposed image.


Spot metering


Evaluative metering
This is a typical problem that wedding photographers have to deal with such as when the groom/groomsmen are dressed in their dark suits, and the bride is dressed in white. There are a few ways to deal with this kind of challenge including using a light meter to accurately read the light emitting from subjects and then adjusting camera settings to synchronize with the lighting; using an 18% gray card to customize the exposure or you could use your camera’s exposure compensation.
Understanding Exposure Compensation
Using the exposure compensation is not difficult, so once you understand how it works and how to use it to your advantage — you’re on your way. The basics of exposure compensation is that you are ‘telling’ your camera to meter a particular scene, and then to increase or decrease the exposure by predefined stops. You can utilize exposure compensation using Aperture Priority, Shutter Priority, Manual and certain Creative modes — although Manual mode requires you to do an additional step.
Using Exposure Compensation in Aperture Priority Mode
In Aperture Priority mode, you choose the aperture and your camera chooses the shutter speed. Therefore, if you utilize exposure compensation and set it lower than the central mark (i.e. underexpose), then the camera will use a high shutter speed.
 On the other hand, if you set the exposure compensation to be overexpose the scene by a certain amount, then your camera will automatically set a slower shutter speed. This is all because the faster the shutter speed, the less light your camera will receive and the slower the shutter speed the more light your camera will receive.
Using Exposure Compensation in Shutter Priority Mode
Shutter Priority mode, another popular semi-automatic mode, requires you to select the shutter speed, and your camera does the rest by selecting the most appropriate aperture based on metering information. In this case, if you select a negative exposure compensation value, then your camera will automatically increase the aperture. However, if you select a positive exposure value (which means to intentionally overexpose), then your camera will automatically choose a wider aperture. The wider the aperture, the more light your camera will receive.
Using Exposure Compensation in Manual Mode
Exposure compensation in manual mode requires you to adjust either the shutter speed or the aperture. The first step is of course to select from the EV scale a negative or positive value.
The control for EV varies on different camera models, but for Canon it’s usually the dial or on Nikon there’s a dedicated +/- button. But regardless of what camera you use, you may check your manual to understand how to control it. There may even be a quick access method that you could learn.
Exposure Compensation is a very useful inbuilt feature of many cameras — not only D-SLRs — that you can use to achieve a desired exposure. As good as your camera is, it can get fooled into selecting incorrect settings, but you as the photographer should know the result you want. Experiment with this feature, but when you’re through make sure to reset the exposure scale to the center.