Triggertrap Mobile Dongle
I had a lot of fun testing and reviewing this little device which has quite a bit of potential — the Triggertrap Mobile Dongle. It appears to be a simple device, but the real power of it comes with application (Android or iOS).
The Triggertap has 17 modes as listed below:
- Timelapse Modepea
- TimeWarp™ Mode
- Sound sensor Mode
- Shock & Vibration sensor Mode
- Metal & magnetism sensor Mode
- Facial recognition Mode
- LE HDR Mode
- LE HDR Timelapse Mode
- DistanceLapse™ Mode
- Motion detection Mode
- Cable Release Mode
- Star trail Mode
- Bulb Ramping Timelapse
- Wi-Fi Slave Mode
- Wi-Fi Master Mode (trigger other devices running Triggertrap Mobile
- Sunset & Sunrise Calculator
- Lag-o-Meter
Application
Triggertrap Mobile App is absolutely free since recently. Thank you Triggertrap!
After starting the application, you will see 14 modes for shooting as listed below:
- Buy Dongle
- Cable Release
- Bang
- Timelapse
- TimeWarp
- DistanceLapse
- Seismic
- Peekaboo
- Star Trail
- LE HDR
- LE HDR Timelapse
- Tesla
- Motion
- Bramping
- Wi-Fi
Buy Dongle
This is the link to get you started, from which you can buy the Dongle device to start using it with your D-SLR camera. A minor flaw, though harmless, is that if you already have Dongle, and connect it to your device, this ‘Buy Dongle’ option still appears. The better place for it would be at the top left corner, or the bottom section of Trigger Mobile Application. Don’t buy wrong cable, if you don’t know which cable, you can check on Triggertrap.com site, or ask them.
Price is under $30, and with dongle + application I don’t think its much.
Cable Release Mode
Cable Release is the first shooting mode which allows you to use your mobile as a simple remote trigger.
Cable release has 4 options:

- Manual: First, your camera has to be in bulb mode. Select shutter speed, and press to trigger.
- Time Bulb: Press to start — press to stop.
- Bulb: Press to start — release to stop.
- Press button to shoot with the manual settings on camera.
All options allow you to select how you want to trigger your camera: Shutter, Focus, Internal and Wi-Fi.
Note: For all of the apps modes, it is best that you pre-focus and shoot your camera in MF (manual focus) mode.
Each mode has its own explanation, and you can always click ‘i’ for more information in menu settings.
Pros: Simple to use and easy to setup. If you don’t have an external (remote) trigger, this can come as handy alternative. The Wi-Fi feature lets you trigger the camera from a good distance without the need for a cable. The only disadvantage is that you need two devices (Master and Slave) to make it work.
Cons: The round selection button is hard to activate on Apple devices. It’s not a big issue, but you will end up turning the button on either too much or too little. In other words, the touch sensitivity is a bit off.
Note: Most of the low and mid level cameras will display and record shutter speed in bulb mode at 1“ (1 sec), but actually it will take faster exposure shots. You can even hear that shutter speed is faster than 1″, even though it will be displayed as 1″.
Bang Mode
As the name suggests, this mode is for sound triggering. This is a very cool mode, and with your creativity you can make amazing photos.
You have the option to select the sensitivity of your input sound from -40 dB up to -0.1 dB.

Before you test this mode, you should check the shutter delay. Click on top right icon with vertical sliders, and adjust your settings and check your camera lag, following on screen instructions.
Here’s an example of use you can make using Bang Mode:

Similar to the Cable Release, you can select your focus points in Bang Mode. We recommend to pre-focus your camera to avoid wasting time — every millisecond is important.
Pros: Easy to setup, simple to use. Works pretty well having in mind that triggering is via smartphone. You can trigger flash for faster performance.
Cons: Nothing major, just a bit of lag which is caused more from the device than the application.


Timelapse Mode
This is one of my favorite modes. I already made some timelapses, but never so easy. I use it even if I don’t trigger camera with triggertrap mobile.


Using this mode is quite simple. Put your camera in Manual, select the length of time, or just play with sliders and options.
Here is what we made with it:
TimeWarp Mode
TimeWarp is Timelapse with options for acceleration, IN, OUT and IN-OUT.
This is a very cool mode which you can use to make some great timelapses with effects.
You can make all effects from regular timelapse in post process, but to make the process easier, you can use Trigger Mobile App right away.

I personally didn’t understand the settings from the beginning, even those on the device. The information I got didn’t help me to understand the graphs. I wish they would put some letters on the diagram to show what is time and what is speed axis. That way, I would understand the parameters for my shooting right away .
One feature that would be useful for this option is to display the fastest and slowest shutter speeds, so that you can know if your camera is capable of handling the settings without having to fill a buffer.
I would also like to see a counter with the number of photos left. The only thing displayed is the time left before the next triggering of your camera.

Video-wise, it would also be helpful for the video length to be displayed as well. It would be very useful to know the number of frames left to avoid interrupting timelapse shooting.
Note: Longer intervals between photos means that action scenes that you shoot will be faster, but the video would be more unstable. For faster intervals, the video will be smoother in terms of transitions between frames making a slower and more natural looking video.
DistanceLapse Mode
This is one of the amazing modes in which the mobile app uses the device’s internal GPS to determine the speed and distance of your movement. If you can mount your camera on yourself, your car, bike, motorbike, boat or other moving vehicles or objects, you can make amazing timelapses — sorry — distancelapses.

Note: No matter where you mount your camera, be sure that the camera is well secured and that the lens is firmly attached. Try to put camera on a sturdy and leveled surface to remove unwanted shaking while taking photos. Find middle exposure (sun-shadow) of your environment and you are ready to go.
Pros: Easy to setup. There’s nothing to adjust except the distance you want to pass between images. No need to press the button to start because once you are in this mode, you just need to start moving :)
Cons: No image counter just as in Timelapse mode. It would be helpful to have info displayed such as the number of images, and the maximum time for movie. Although not a major disadvantage, it would be very useful.
Seismic Mode
Seismic is really cool, but its use is limited by your mobile device. You don’t want to risk getting your device wet, crushed or broken just because you want to activate the trigger from vibrations.
Most of its use would be on a tabletop for indoor photography. But for more creative use, you could place your device on some kind of mechanism to vibrate it safely from a large distance.
If you can do this, you can catch bear walking in the woods ;), play games with your friends, or even snap a picture of a ‘thief’ touching anything near your trigger device and camera — even in another room if you want ;)
You have option to pick from 0,002g up to 0,020g sensitivity.

Pros: Works as described.
Cons: As stated in description above, device should be on a shaky surface or shaken by an outside force. You can risk damaging your device if you’re not careful, and in having to be so careful, it could also limit your creativity.
Peekaboo Mode
This is facial recognition trigger mode. You can pick from 1 to 5 faces, and your device will trigger the camera when the selected number of faces is identified from the device (smartphone or tablet) camera.
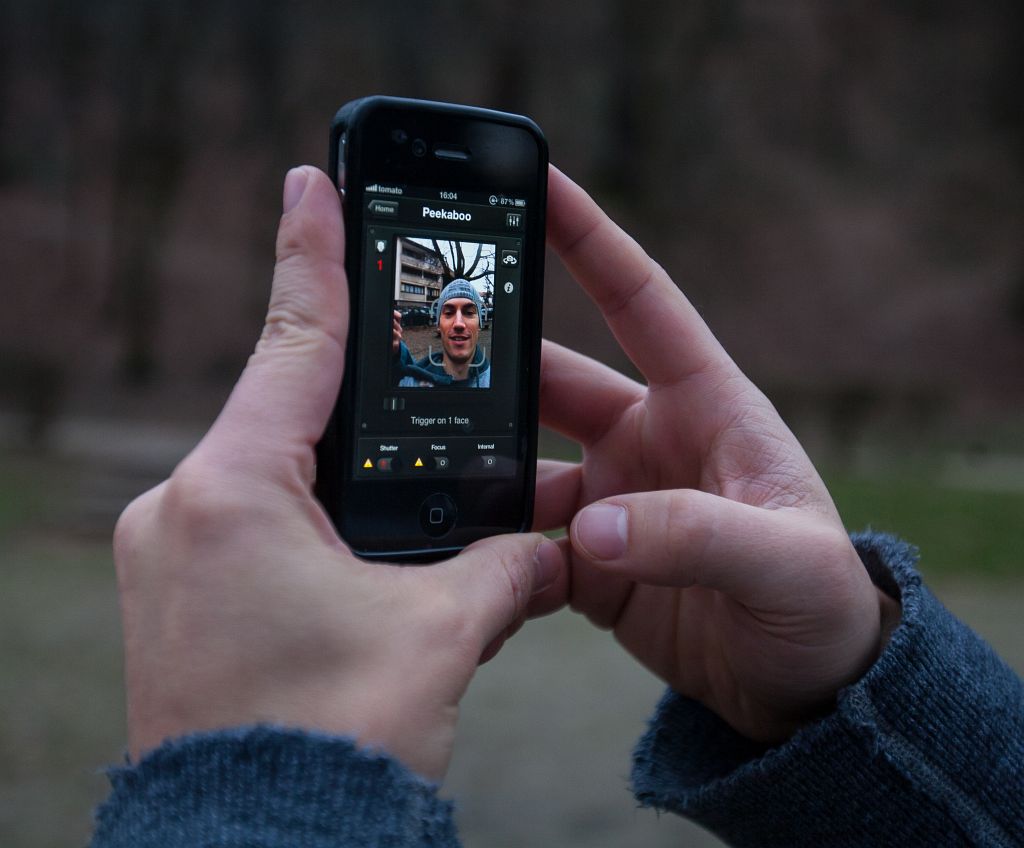
Pros: This mode works as it should, but I’m not really sure how and where to use this mode.
Cons: I noticed that iPad doesn’t recognize faces anywhere near the capabilities of the iPhone 4.
Star Trail
This mode is used to shoot many long exposure shots that you connect into one image or video. This is a timelapse-for-stars mode or for any other kinds of movement in a low-light environment.


We didn’t test this mode, and if you do, please let us know or share your work with us. We will post it here and give you all the credit. ;)
LE HDR
LE HDR stands for Long Exposure High Dynamic Range.
Make amazing HDR shots that you can’t make with your camera. On many cameras, there is the feature of EV (Exposure Value) bracketing from -2 up to 2, which allows you to take 3 consecutive shots with three different exposures, Dark (-2), Middle (0) and High tone (+2).
With Trigger Mobile App, you can shoot even outside of this range, from a minimum of 3 exposures up to a maximum of 19, in steps of 1/3 EV. You can select stops from 1/3, 1/2, 1 and the standard 2 EV.

The unedited image shown above was made (joined) via Photomatix 4.2 software and one of the free Photomatix Preset found online. For best result, I would combine images with clearly visible clouds against the blue sky with the above HDR image.
Note: I would love to see what is min. and max. exposure, but instead you can set middle exposure and the number of exposures. You can calculate all exposures, but I just think it would be much better to at least display the edge exposures as well, as without this information, you can end up with some completely dark images or a few consecutive shots with the same exposure.

Pros: This mode does exactly what it should. Just take note that the fastest shutter speed over Triggertrap Mobile Application is 1/15.
Cons: No display of edge exposures. Setting application to shoot in 1/3 EV steps, Middle exposure: 1/15, 7 Exposures, would end up with a few shots having the same exposure.
LE HDR Timelapse
LE HDR Timelapse, as you may figure, means Long Exposure High Dynamic Range Timelapse — a mode for creating videos in HDR.
We didn’t shoot in this mode, and if you did, please share your work with us to publish it in this article, thank you ;)
Note: I like the settings in for this mode. They are simple and easy to use , but it would be useful to have additional features such as: the ability to select the number of sets I want, a counter showing the number of sets already made, and a counter of how many sets are left during shooting. Timelapse is in fact video, and videos are made from frames. If you want a 10 sec. video at 24 fps,that video will have 240 images, but in this mode it will be 240 sets. Even if you make your HDR Timelapse in couple of days or an even longer period, it will be very helpful to have some kind of counter.
When shooting RAW, you can make HDR from a single image, but LE HDR Timelapse makes multiple images which means that there can be some discrepancies among photos. It’s best to shoot something that doesn’t move at all, or something that moves very fast through the frame while you have very long exposure, as it will be invisible.
I highly recommend that you make a regular TimeLapse with RAW, make it HDR through post-processing to produce a HDR timelapse. The reason is simple — less Camera wear, less chances for mistakes, and less time spent on the work-field.
Tesla Mode
This mode triggers the camera based on a magnetic field. It can trigger the camera in the range from 0,5uT up to 50,0uT. To be honest, I didn’t find any use for this mode, but you may. I do have a few examples of how you could use it, that is if there is any sense for it at all.

Send us your example shots, and we will publish photo and credits ;)
Pros: Works as described — we tested it by placing a magnetized screwdriver close to the iPhone, and it did in fact trigger the camera to shoot.
Cons: Nothing negative to say about this mode. We only needed to use our creativity more.
Motion Mode
This is one of the modes that I don’t like. It’s difficult to get it working seamlessly, and because of this, it is virtually useless to me.
Here’s how it works: You take a picture (Sample Background) with your device. It would be best to adjust camera and leave it, during and after you take the Sample Background. After a certain change in percentage is reached, your device triggers Camera.

Pros: No pros. It probably works best with purely solid color backgrounds, but this isn’t applicable for a number of locations such as a room in your house or the outdoors which has an abundance of colors.
Cons: Percentage of change shifts when you walk out of frame. When you set your background, and you walk in front of the camera, the percentage of change shifts — which is alright. But once you walk out of frame, the change is not what it used to be. The percentage keeps changing without any change in background.
Bramping Mode
Bramping or Bulb-ramping is timelapse mode to make transfers from light to dark or dark to light (Sunset or Sunrise).


The fastest shutter speed is 1/15, and like I mentioned before, on most low and mid-range cameras it will shoot 1/15 but display 1” (1 sec).
Pros: This mode works as it should, and it has all the important features needed. No video flickering, love it!
Cons: The only thing I’d say, is that it would be useful to have the current exposure in Live mode display, because if you missed your exposures, the entire set will be ruined. If you have more than one camera, you can see exposure that is currently set, and check the real exposure on the second camera, and maybe you can adjust your shooting before its too late.
Conclusion
Keep in mind that this is a mobile device triggering system, and naturally it has its own limitations. You don’t want to leave your main phone in the forest to trigger shoot some animal walking around. It would not be smart to leave your device out in the rain or snow while shooting timelapses. Keeping that in mind, you will have yourself a quite neat and functional triggering system that is small, convenient and simple to use. You can carry it with you wherever you go!
I highly recommend this device to any creative person who is into timelapse, bramping and HDR photography.
You can get your copy of Dongle here.
Overall Pros & Cons
Pros: Device is cheap. Application is free. You might need some adapters to extend range if you don’t use Wi-Fi. Application is simple to use.
Cons: Some of the Triggertrap Mobile Dongle modes are with less useful but not major info. If your device goes to “dim” mode, you should click on device before going to “home” screen, cause your device will be locked dimmed, to put it back to same brightness as it was, just go to Settings, General, Brightness and click on slider where it is, and it will come back to normal.
Check out Behind The Scenes on our Facebook page: behind the scenes.